How to Apply DTF Transfers: Perfect Heat Press Settings for Flawless Prints | GOAT DTF
berat mersanUnderstanding how to apply DTF transfers correctly can make or break your final product. Whether you're printing custom t-shirts, hoodies, or tote bags, mastering temperature, pressure, and peel timing is essential for flawless, long-lasting prints.
What is DTF Transfer Application?
DTF (Direct-to-Film) printing uses a film-based transfer process that combines heat and pressure to bond vibrant designs onto fabric. Unlike traditional screen printing or vinyl, DTF transfers offer superior color accuracy, soft hand feel, and compatibility with virtually any fabric type including cotton, polyester, blends, and even leather.
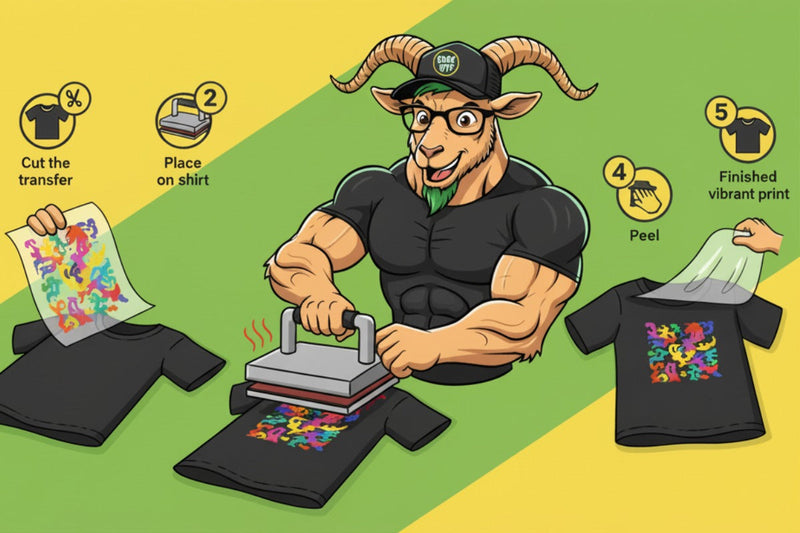
Step-by-Step: How to Apply DTF Transfers
1. Pre-Press Your Garment
Before applying any transfer, pre-press your garment for 3–5 seconds at medium pressure. This crucial step removes moisture, eliminates wrinkles, and ensures optimal surface preparation for strong adhesion. Skip this step and you risk poor ink transfer and premature peeling.
2. Position the Transfer Precisely
Carefully align your DTF transfer on the garment. Use a ruler or alignment tool for precision placement. Avoid stretching the fabric during positioning, especially with knit materials and blends, as this can cause design distortion once the fabric relaxes.
3. Set Your Heat Press Correctly
The golden rule for DTF transfer application: 310°F (155°C), medium pressure, 12-15 seconds press time. These settings work for 90% of fabrics. Always use a temperature gun to verify actual platen temperature, as dial readings can be inaccurate.
4. Execute the Hot Peel Technique
Immediately after pressing, peel the carrier film while the transfer is still warm (hot peel). GOAT DTF transfers are engineered for instant hot peel application, ensuring clean separation with zero residue. Wait too long and you'll encounter cracking or incomplete transfer.
5. Optional Final Press for Maximum Durability
For commercial-grade durability, apply a finish press: cover the design with parchment paper or Teflon sheet and press for 2–3 seconds. This step sets the adhesive completely and creates a professional matte finish that withstands repeated washing.
Optimal Heat Press Settings Chart
| Fabric Type | Temperature | Pressure | Time |
|---|---|---|---|
| 100% Cotton | 310°F (155°C) | Medium | 12-15 sec |
| Polyester/Blends | 305°F (152°C) | Medium | 10-12 sec |
| Performance Fabrics | 300°F (149°C) | Light-Medium | 10 sec |
| Fleece/Hoodies | 315°F (157°C) | Firm | 15 sec |
Essential Best Practices for Perfect Prints
- Always run a test press on scrap fabric before production runs
- Use parchment paper or Teflon sheets to protect your transfers and heat press
- Apply consistent, even pressure across the entire transfer surface
- Allow garments to cool completely before handling or packaging
- Store unused transfers in a cool, dry place away from direct sunlight
- Clean your heat press platen regularly to prevent residue buildup
Common DTF Application Mistakes to Avoid
- Excessive Temperature: Pressing above 320°F can scorch transfers, blur fine details, and damage heat-sensitive fabrics
- Delayed Peeling: Waiting too long to peel causes adhesive bonding to the carrier film, resulting in cracking or incomplete transfer
- Skipping Pre-Press: Moisture trapped in fabric creates steam barriers that prevent proper adhesion
- Uneven Pressure: Inconsistent pressure leads to partial transfers with weak spots that fail during washing
- Over-Pressing: Extended press times degrade ink quality and can melt synthetic fabrics
Troubleshooting Guide
Design Not Adhering Properly?
Increase pressure slightly or extend press time by 2-3 seconds. Ensure you've pre-pressed to remove all moisture. Check that your heat press temperature matches the actual platen temperature.
Colors Look Faded or Dull?
Your temperature may be too high, causing ink degradation. Reduce by 5-10°F and test again. Also verify you're using the correct color profile for your design.
Film Won't Peel Cleanly?
Temperature might be too low or pressure insufficient. Ensure you're peeling immediately while warm. GOAT DTF transfers are optimized for instant hot peel—if issues persist, contact our technical support.
Why Professional Print Shops Choose GOAT DTF
GOAT DTF delivers premium DTF transfers engineered for consistent, professional results. Our transfers feature vibrant, true-to-design colors, ultra-strong adhesion, and industry-leading durability that survives 50+ wash cycles. With same-day production, nationwide 2-3 day shipping, and factory-direct wholesale pricing, we're the trusted partner for print businesses across the US.
Industry Recognition: Don't just take our word for it—check our verified customer reviews and see why leading print shops trust GOAT DTF for their production needs.
Quick Reference Summary
- Optimal temperature: 305-315°F (152-157°C) for most fabrics
- Press time: 12-15 seconds with medium pressure
- Always pre-press garments for 3-5 seconds
- Peel carrier film immediately while warm (hot peel)
- Optional finish press for 2-3 seconds for maximum durability
- Test press one piece before bulk production
Ready to Achieve Perfect Prints?
Master the art of DTF printing with premium transfers designed for flawless application every time. Whether you're starting your first t-shirt business or scaling an established print shop, GOAT DTF provides the quality, speed, and support you need to succeed.
Need more guidance? Browse our complete collection of printing guides for expert tips, advanced techniques, and troubleshooting resources.